
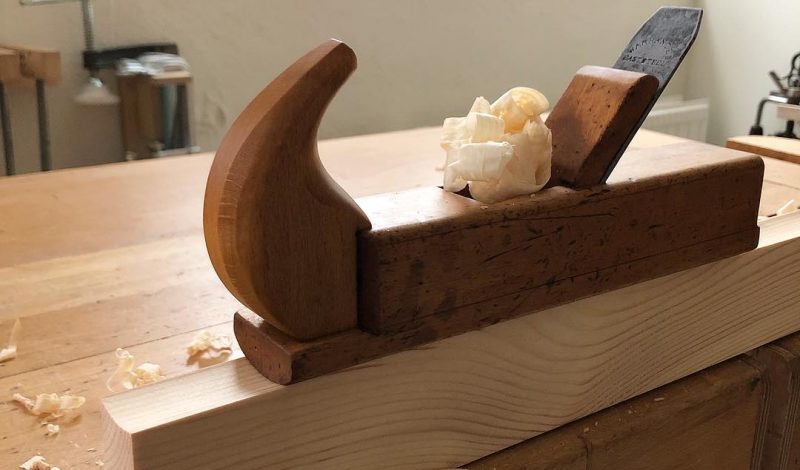
A wooden hand plane is a joy to use and unless you have ever had a properly tuned and sharpened wood hand plane and used it you have missed one of the greatest pleasures of woodworking. There is something about wooden planes, they feel better to use, they produce a finer cut, there is less chatter at the blade and they look cool.
When these tools were originally produced they were used by craftsmen to do many of the things that are done today with modern power tools. These tools were used everyday, were well maintained they provided their owners with years of service. As the industrial revolution progressed, wooden planes were used less and less, many were burned for their wood and unless they were in use, they fall into a state of disrepair and neglect.
Many old planes still have years of service left and if they are not going to be used some of the methods described here should be done to stabilize and prevent further deterioration. When the planes are brought to serviceable condition, they are much easier to maintain and preserve. Some of the methods are more aggressive than others and should be used on planes that are going to be used but may not be advisable for some highly collectable hand planes. Very rare and valuable pieces should be stabilized to prevent further deterioration of the artifact but doing any restoration to make it serviceable can lower the value to a collector or museum. As far as I am concerned old tools are meant to be used. If it is made by a collectable maker or is a rare example, I choose to sell the valuable tools and buy ones I can use.
Old planes and their irons and related hardware can be in various conditions depending upon how much they were used. Years ago I bought a moving filister plane that had never been used. The boxing was sharp and crisp, the screws on the adjustable fence have crisp slots and I don’t think the iron was ever sharpened, just ground from the factory. Because this tool was in new condition, I chose to sell it and buy one I could use. Tools in this condition are rare and most are in much worse shape.
The first thing I do to old planes are examine them to determine the condition, I check the boxing if any to determine if it is loose, which it usually is. The first thing I do is gently remove the wedge holding the blade. Many old planes have knobs on the front ahead of the blade and on the back end of the plane. These are for striking with a hammer to loosen the blade. Old planes without strike knobs show evidence of hammer and mallet blows on the top front or backside to loosen up the wedge and iron. Instead of striking the plane I will usually gently tap the sides of the wedge with a wooden mallet to loosen the wedge. Molding planes have wedges with notches and many people use a mallet or hammer to loosen the wedge. Do not do this! Place the notch of the wedge against the edge of the workbench with the front of the plane pointing to the floor. Then with a soft wooden mallet or your hand, strike the backside of the plane to gently loosen the wedge. It doesn’t take much force to loosen the wedge. Another method is to grasp the top of the blade and wedge in one hand and the plane body in the other and strike the backside of the plane down on a wooden workbench to dislodge the wedge. The top of my workbench is pine, if your workbench is made of hardwood, use a soft piece of pine or spruce to strike the plane or wedge against. Also tapping on both sides of a stubborn wedge will sometimes loosen the wedge. If you cannot remove the wedge don’t strike the notch or the plane with a hammer or mallet, that is the surest way to damage the wedge. I have replaced damaged wedges, but in most cases they can be repaired thereby maintaining as much of the original as possible. If you have to replace the wedge, keep the old one with the plane in case you sell it in the future, the original wedge will add to its overall value, even if damaged. If you have remnants of the original wedge you can use it as a pattern to make a new replacement wedge. If the top of the notched wedge is broken off, use another old wedge to give you the proper outline for your new-notched wedge. The backside of the wedge needs to be flat to engage the blade. The sides need to be smooth and the wedge should fit tight but not too tight. The front edge of the wedge must conform to the wedge opening is the planes body. If you are copying an old wedge make sure that it is not worn out as the new one may not hold the blade properly. The tip of the wedge is usually shaped to aid in chip removal and preventing wood chips from jamming against the end of the wedge.
The next step in tuning a wooden hand plane is to make sure the wedge/blade mortice is clean. Use a narrow chisel, files and floats to smooth out and clean the mortice. The mortice can have dirt and rust from years of neglect and need to be clean and smooth in order for the wedge and blade to fit properly. If the fit is not snug, the blade will loosen and move as it is being used.
I next turn my attention to the body of the wooden plane. I usually use a scraper to lightly remove any heavy surface accumulations such as paint splatters. I then wash the plane with soap and water taking care not to soak the wood. I use a rough piece of linen cloth to do the cleaning; it is abrasive enough to remove the grime but will not damage the wood or original patina. What you are washing off is years of accumulation of sweat and grime, not the original patina. Do not scrub too hard, just enough to remove the dirt. I then place it in sunlight to dry completely; sometimes I use an air nozzle to blow out any moisture in the wedge/blade mortice and in other details. After I have cleaned the body and it has dried completely; I check the boxing (if any) to see if it is loose. Most of the time the original hide glue has failed and friction is the only thing holding the boxing in place. If the boxing has had excessive wear and needs to be reshaped, you can do this by adding a shim under the boxing to make it stick further out of the plane body and the boxing is reshaped to its original profile. Most of the old boxing is second grade stuff with knots and other defects that don’t show once they are installed. If the boxing is not loose and needs to be removed to be repaired or repositioned then alcohol can be introduced to the glue joint to crystallize the hide glue allowing the boxing to be removed. If the boxing is tight and does not need any repair, they should be left alone. Place a thin blade between the bottom of the boxing slot and the boxing and twist slightly. Once a little space is made a wider blade is inserted and gently twisted. Take care not to damage either the body or the boxing. The boxing needs to be cleaned of old glue and any dirt or debris and I use a toothing cabinet scraper to gently remove accumulations and reapply the best wood glue. The slot also needs to be clean and I use a chisel, file or float to remove old glue and debris to allow the boxing to fit properly. Once they are clean I test fit to make sure that they are all in their proper position. If they are excessively worn, I will shim it out to its proper location before gluing. Many old planes have multiple pieces of boxing, there are usually two, one in front of the blade and one behind, but some are made up of smaller pieces. When re-gluing the boxing into the plane body I make sure that they are all lined up properly on the same plane. When I re-glue the boxing for a bead plane for example, I will place a proper sized dowel in the boxing and clamp it down. This insures that all of the working surfaces of the boxing are on the same linear plane. Once the glue has dried the surfaces can be carefully dressed to make sure that the transition between pieces is smooth and even. For this process I use a fine long file to produce a flat and even surface.
Most old wooden planes have single irons, in other words it doesn’t have a chipping iron. Double irons are equipped with a chipping iron, a secondary iron attached with a screw in a slot through the main cutting iron. The surfaces between the two must be perfect to prevent any chips from going under the chipping iron. Single iron planes rely on the iron to do the cutting and a fine mouth opening in the planes sole to make a fine cut. I have several examples where one of the previous owners of the plane have enlarged the throat or mouth for easier chip egress. This is unfortunate and if the blade is sharp and the throat is clean, chip accumulation should not be a problem. Almost all old irons are laminated; the body of the iron is made of wrought iron and a thin veneer of steel is forge welded onto the topside of the iron at the cutting edge. This was done for a couple of reasons; the cost of good steel was expensive and scarce and an ‘iron’ of solid steel would be difficult to sharpen and would chatter more than a laminated blade. While the steel is hard and brittle, the iron is malleable and dampens chattering that can occur. When you sharpen the old irons you are sharpening mostly iron and only the cutting edge is hard steel. If the irons are bent they can be straightened but some of the old metal is quite brittle and can break. I had an old plow plane iron that had been bent near the tip and while the iron bent the thin veneer of steel fractured across its surface. I gently straightened the iron and it will have years and years of grinding before the fracture presents a problem. I always heat the irons slightly before attempting any straightening. Never try and straighten a cold iron. I also clean off any surface rust and if the blade is badly pitted or rusted I will treat it with electrolysis to remove only the rust. After the blade is straightened and cleaned it can be sharpened. Always make sure the back (opposite the bevel) is perfectly flat before any attempt is made to bring the bevel to its proper angle. For molding plane irons I use a file to rough shape the bit to match the bottom of the plane, then sharpen using standard sharpening methods.
Some wooden planes have metal parts such as skates, depth stops and fence screws. While all wood screws are iron and tend to rust, these can be difficult to remove and care should be taken when removing any iron screws from the wooden bodies. These are soft iron screws and the slots can be easily stripped out. Here is a trick for removing stubborn screws. Put a few drops of alcohol on the head of the screw so it goes down the wood on the sides. Allow soaking for a few minutes then placing a proper fitting screwdriver in the slot and slightly attempting to tighten the screw in a clockwise direction. If the screw moves slightly in the tightening process, reverse and then try removing it by turning counter-clockwise. Clean off the rust and freshen the screw threads with a file if necessary. If the hole is damaged and will not hold the screw, it should be plugged with a matching wood plug, usually beech. Also match the grain and direction, don’t put a dowel in the hole, the grain is going in the wrong direction, use a cross grain plug. Depth stops are usually made of made of brass. Depth stops need to operate freely and should have a smooth sole so as not to score the work. You may have to disassemble the mechanism to clean it, freshen the threads if necessary, lubricate and re-install. Clean out the mortice for the mechanism to insure that it will not jam up when it is re-installed.
Some metal parts such as skates are riveted onto the plane bodies with iron rivets. If these are loose you might need to peen the heads slightly to tighten the rivets. Gently peen the outside edges of the rivet to tighten the head, if you strike the rivet in the center you run the risk of bending the rivet and breaking the wood of the plane body.
Some complex planes such as plow planes have adjustable fences, some secured with wedges or thumbscrews and some have threaded arms that have nuts to adjust the fence to the proper position. These arms on the fence need to be able to move freely in the mortices through the body. After years of shrinkage some of these fences are tight and require some work to make them work smoothly. The mortice is usually the place to make the adjustments to keep the original patina and finish on the arms. The wedges need to be clean and work properly. If they are loose and do not lock the arms, a small piece of veneer can be glued into the mortice to make the wedges tight against the arm. If they have threaded thumbscrews the screw needs to work properly and the end of the thumbscrew should be smooth and slightly rounded on the end to prevent it from damaging the arms. Threaded arms with nuts need to work properly. Some of the threads on old arms have broken off but in most cases the arms still work, even without all the threads. If the nuts are to tight to work, you might want to freshen out the internal threads to make them work properly. A little beeswax on the moving parts and threads can help make the threaded parts work better. Most fences are riveted on the arms and they should not be too tight as the fence should be able to move slightly on the arms. At times the face of the fence will have excessive wear and scoring from years of use. I have a fixed fence plow plane and the fence was too rough to use, the wear was at an angle so when you started planing the blade would jam into the groove. I smoothed it slightly and glue with hot hide glue, a thin piece of beech to the face to take the additional wear that the newly restored plane will get in the future.
Old smoothing planes, joiners, fore planes, jackplanes and other planes for flat work need to have a narrow mouth or throat in the plane to produce the finest cuts. These old planes get wear and are resurfaced to make the soles flat. This process of wear or resurfacing will cause the mouth to widen producing a rougher cut. In order to make the planes serviceable a piece of beech or matching wood is inlet just ahead of the mouth. A shallow mortice is carefully made just ahead of the mouth to a predetermined depth. A piece of wood is fit into the mortice and is made to tighten up the mouth of the plane in order to produce a finer cut. After the glue is dried it is shaped to its final levels and the mouth is opened just enough to give as small an opening as possible. This may require several fittings to get it right, but it is well worth the effort. It is also possible to add a piece of wood to the entire sole of the plane, giving you an opportunity to make the mouth opening the proper size. Clean and smooth off the base preparing it for glue, toothing is always a good idea. You can cut the mouth either before or after it is glued to the sole of the plane. After all repairs and cleaning I treat the wooden planes with boiled linseed oil to rejuvenate the wood and give it a fine traditional finish. I coat the wooden parts of the plane with the oil, let it soak in and then wipe off the excess.
Now that all repairs and restoration work has been done it is time to tune the plane, although a lot of the process up to this point has brought you to this stage. The sharp blade is placed into the plane and the wedge is inserted into the mortice and pushed into place. I place the blade just above the surface of the sole of the plane and place the wedge tightly into the mortice. I tap the top of the wedge against the workbench or using a wooden or rawhide mallet gently tap the wedge tight. I then use a hammer to gently tap the blade until it projects just below the sole of the plane. In order to test the plane I use pine or spruce for the practice pieces. If you can get a good shaving from softwood like pine or spruce you will get a good shaving from any hardwoods. Softwoods require a much sharper plane iron to produce a fine chip free cut. I will shoot several pieces of wood with the plane to help ‘break it in’. Remember these are wooden tools and like wooden instruments such as violins they require use to develop their voice. The more you use the plane the better it works, except that the blade may get dull. Once you get it properly adjusted and after it has shot several feet of molding or planed a couple of boards flat, the tool starts to settle in to its proper condition. You may have to take the iron out, touch up the blade, check how it sets on the ramped mortice and that the wedge is holding it properly. Make any adjustments that are necessary, put the plane back together and plane some more boards. The tool should sing as it removes the shavings and this continued use will help bring the tool to into fine tune. I feel that the plane works better after it has warmed up a little and does not produce the best cut until it is warm. I think that the use sets up harmonics in the wood and somehow imparts a spirit or life into the tool. This may sound crazy but these tools are an extension of my hand and I like a tool that feels alive in my hands.